

A tiny kitchen can feel crowded before you even put the groceries away. One awkward cabinet, a pile of cereal boxes, and suddenly the counter becomes the pantry. The good news is that you don’t need a full pantry room to gain useful storage. Narrow cabinets, rolling carts, wall shelves, drawer organizers, and overlooked corners can hold a surprising amount.
The best tiny kitchen pantry ideas turn small gaps into dedicated food-storage zones. Use vertical space, shallow shelves, stackable containers, pull-out organizers, and compact furniture to keep everyday ingredients visible and easy to reach. Many of these projects cost less than a major kitchen update and can be finished in an afternoon.
1. Turn the Gap Beside Your Refrigerator Into a Slim Pantry
That skinny space beside the refrigerator is often wasted because standard cabinets don’t fit there. Measure the opening from floor to ceiling, then look for a pull-out pantry cabinet between 8 and 12 inches wide. IKEA and Home Depot carry narrow storage options, while a simple DIY plywood version can cost less if you’re comfortable with basic tools. Expect to spend about $80 to $250 depending on whether you build or buy it. Use shallow shelves for canned soup, pasta, spices, tea, and baking supplies rather than large bags that are hard to pull forward. A pull-out design lets you see the whole shelf from the side, so nothing gets buried behind a cereal box. Add slim shelf liners that can be wiped with a damp cloth when crumbs collect. White cabinetry works well with light kitchens, while natural oak adds warmth to an all-white room. The key is keeping every shelf shallow enough that one quick glance shows what you have.

2. Add a Rolling Pantry Cart to an Unused Corner
A rolling cart is perfect for renters or anyone who doesn’t want to drill into cabinets. Choose a three- or four-tier cart around 6 to 9 inches wide and slide it between the refrigerator and a wall, beside a cabinet, or into a breakfast nook. Basic carts cost around $20 to $45 at Target, Walmart, or Amazon, and many have casters that make cleaning behind them easy. Put canned goods and heavier jars on the bottom shelf, snacks in the middle, and lighter items like tea or bread on top. I like using small handled bins on each level because they turn one crowded shelf into separate categories. A cart with a metal frame also gives you a place to hang measuring spoons or a small grocery bag holder. Check the wheels before buying. Cheap casters can wobble when the cart is fully loaded. Keep the cart at least a couple of inches away from a heat-producing appliance, and wipe the shelves weekly if you’re storing flour or cereal nearby.

3. Build a Pantry Wall With Adjustable Shelves
If one kitchen wall is mostly empty, turn it into a shallow pantry zone rather than adding a bulky cabinet. A shelving unit only 10 to 12 inches deep can hold cans, jars, boxed food, and small appliances without taking over the room. Plan for about $60 to $180 for a freestanding shelving system, depending on the material and width. IKEA has several modular options, while Home Depot sells unfinished wood shelves that can be painted to match your cabinets. Keep the lowest shelf 6 to 8 inches above the floor so sweeping and mopping remain easy. Put everyday items between waist and eye level, then reserve the upper shelves for backup groceries. Matching baskets make the arrangement calmer without hiding everything. For a polished look, paint the shelf backing the same color as the kitchen wall. If the pantry sits near a cooking area, choose a wipeable finish and avoid placing open fabric baskets directly beside the stove.

4. Use the Back of the Pantry Door for Small Supplies
The back of a pantry or cabinet door gives you several extra inches of storage without changing the footprint of the kitchen. Install an over-the-door rack with narrow wire baskets, or mount a slim organizer directly onto a solid door. A useful rack usually costs $18 to $50 at Walmart, Target, or Amazon. Keep the shelves light because a heavy door organizer can make hinges sag over time. This is a great spot for spice packets, snack bars, tea bags, seasoning envelopes, small jars, and unopened baking decorations. Measure the distance between the door and the shelves before buying anything. A rack that’s too deep can hit the interior shelves when the door closes. Use clear bins for loose packets and wipe them every few weeks because crumbs collect in corners. For a rental, choose a tension or over-the-door model rather than drilling. If you own the home, screw-mounted racks are steadier and handle more weight. The storage is small, but those little items are exactly what tend to make a pantry feel messy.

5. Swap Deep Shelves for Pull-Out Drawers
Deep pantry shelves look spacious until a jar of peanut butter disappears behind three boxes of pasta. Replace fixed shelves with full-extension pull-out drawers so food comes toward you instead of forcing you to reach into the back. DIY pull-out hardware can cost roughly $35 to $70 per drawer, while professionally fitted systems cost more. Choose drawers with low sides for cans and taller sides for bags or bottles. A 20- to 24-inch-wide drawer is especially useful for grouped groceries because you can see several rows at once. Keep heavy cans on the lower levels and lighter packaged foods higher up. Use a vacuum or handheld brush around the drawer tracks every few months, then wipe the shelves with mild soap and water. Before ordering hardware, measure the cabinet’s inside width, depth, and frame thickness. One small measurement error can leave you with hardware that doesn’t fit. This is one of the pricier ideas on the list, but it changes the way a deep cabinet functions every day.

6. Give Canned Goods Their Own Narrow Shelf
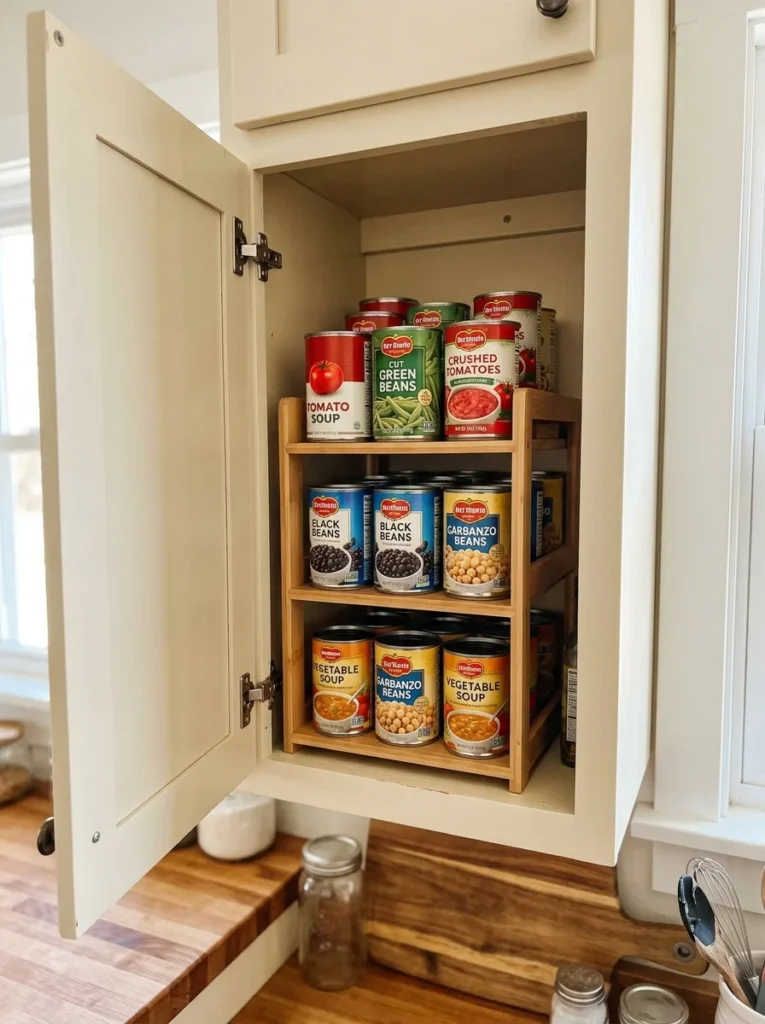
Cans don’t need a huge pantry shelf. A narrow stepped rack keeps soup, beans, tomatoes, and vegetables visible in rows rather than stacked in a dark pile. Most tiered can racks cost $12 to $30 and fit inside standard cabinets. Look for a model around 12 inches wide and 10 inches deep if your cabinet is tight. Arrange cans by type, with everyday foods toward the front and less-used items behind them. If you have children grabbing snacks, reserve the lowest level for cans they can safely reach. Metal racks are easy to clean, while bamboo versions look warmer on open shelving. Don’t overload the rack beyond its stated weight limit, especially if it uses thin wire. Wipe canned goods before putting them away if they’ve been stored in a garage or dusty grocery bag. You can also add small adhesive labels to each row if several cans have similar packaging. This little change prevents duplicate purchases because you can immediately see what is running low.
7. Create a Breakfast Pantry Station
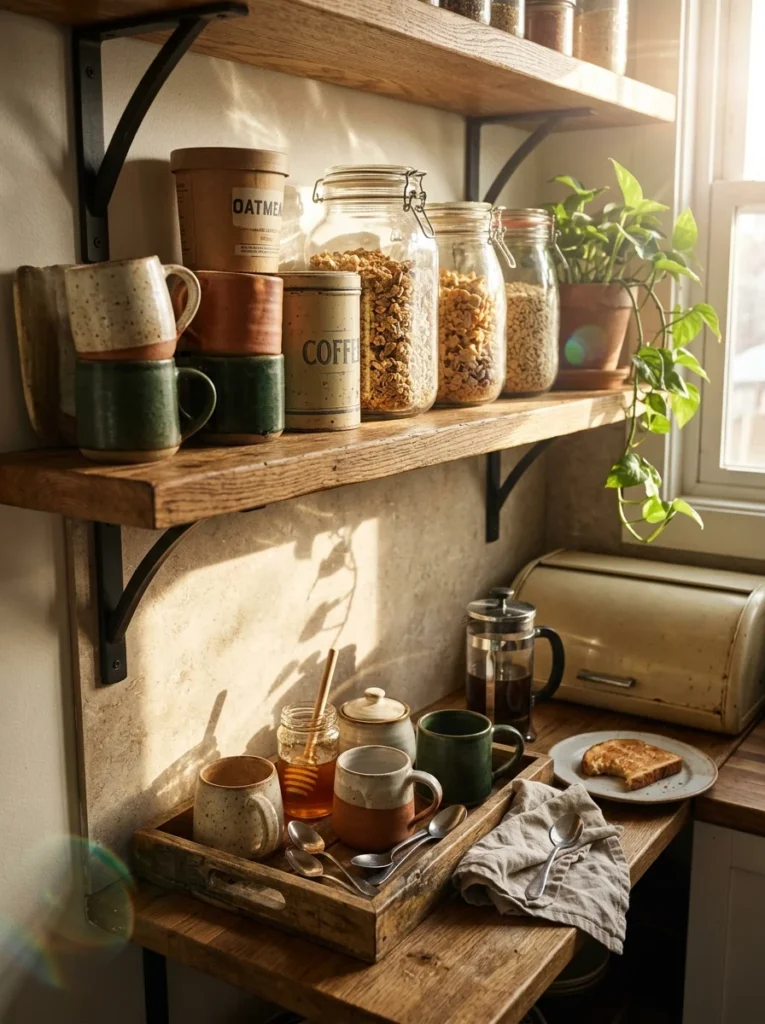
If mornings involve coffee, cereal, oatmeal, and toast, give those foods their own compact station. Use one cabinet or a 24-inch-wide shelf to group the items you reach for before work. A simple breakfast station can cost $25 to $80 if you add a small shelf, matching containers, and a tray. Put coffee or tea near the kettle, cereals in airtight containers, and bread in a lidded box. A shallow tray keeps jars and mugs from spreading across the counter. Choose one color for containers, such as clear glass with wood lids, so the station doesn’t look visually crowded. Keep the coffee maker on the counter only if you use it every day. Otherwise, store it below and leave the surface open. Wipe coffee grounds quickly because they attract moisture and leave dark marks on light surfaces. This setup also helps separate breakfast food from dinner ingredients, which makes grocery restocking faster. You can build it into an existing cabinet without sacrificing much room.
8. Install a Pegboard Pantry Organizer
A pegboard isn’t only for garages. A painted wood pegboard can hold baskets, hooks, measuring cups, reusable bags, and lightweight pantry supplies on a narrow wall. A 24-by-36-inch pegboard setup usually costs $30 to $70 for the board, hooks, and baskets. Mount it securely into wall studs or use appropriate anchors for your wall type. Keep heavier objects low and lighter items higher. A soft white, warm beige, or muted green board looks more like kitchen furniture than workshop equipment. Use small wire baskets for packets and clips for opened bags. Keep flour and sugar in sealed containers rather than hanging bags from hooks. Dust the board every week with a microfiber cloth, especially around open shelves. The best part is that you can move the hooks as your grocery habits change. It also works well beside a pantry cabinet where the wall above the counter would otherwise sit empty. Keep at least 18 inches of clear space above a cooking surface.

9. Store Dry Goods in Stackable Square Containers
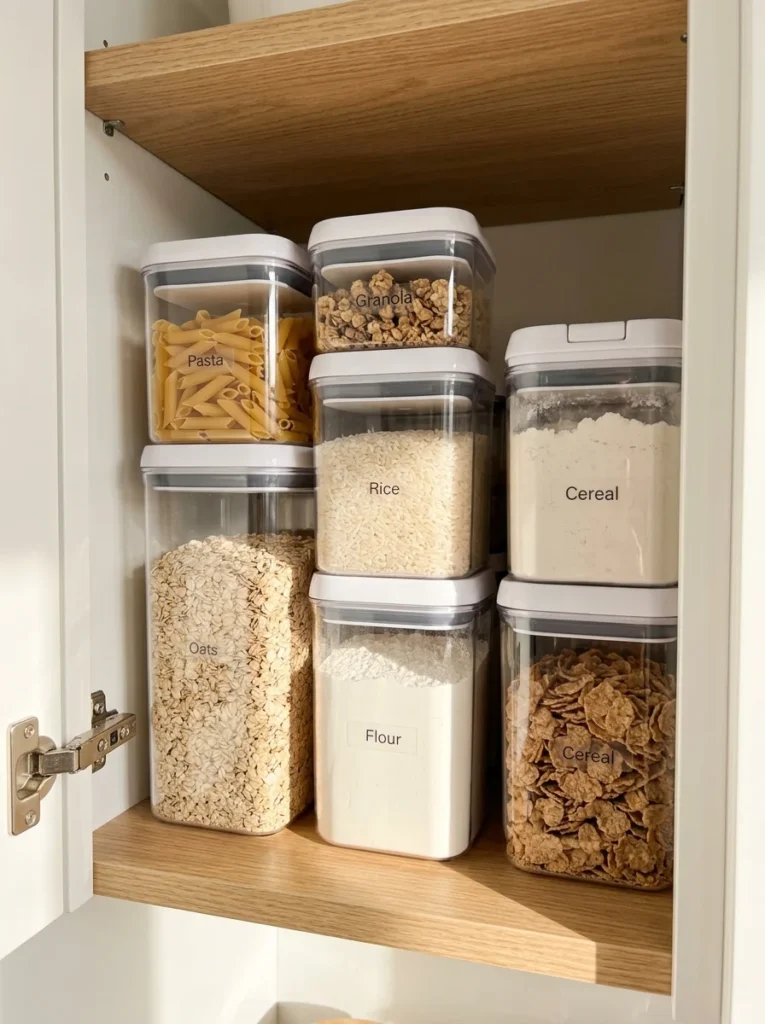
Round containers waste valuable shelf corners, especially inside narrow cabinets. Switch pasta, rice, flour, oats, and cereal to stackable square or rectangular containers that use the full shelf depth. A set of six to eight airtight containers often costs $25 to $45 at Target or Amazon. Pick containers with wide openings so you can scoop ingredients without spilling flour over the counter. Clear sides make inventory easy, while white or bamboo lids keep the shelf looking tidy. Before buying a full set, measure your shelf height and check each container’s dimensions. Tall containers are excellent for spaghetti and cereal, while shorter ones work for rice, sugar, and baking mixes. Wash containers with warm soapy water and let them dry completely before refilling. Never pour new ingredients on top of old ones without checking dates and crumbs first. This is especially helpful for small kitchens because one organized shelf can replace several half-open boxes. For more pantry organization ideas, you can also save this related guide: [INTERNAL LINK: article about small kitchen cabinet organization ideas]
10. Add a Narrow Shelf Above the Kitchen Door
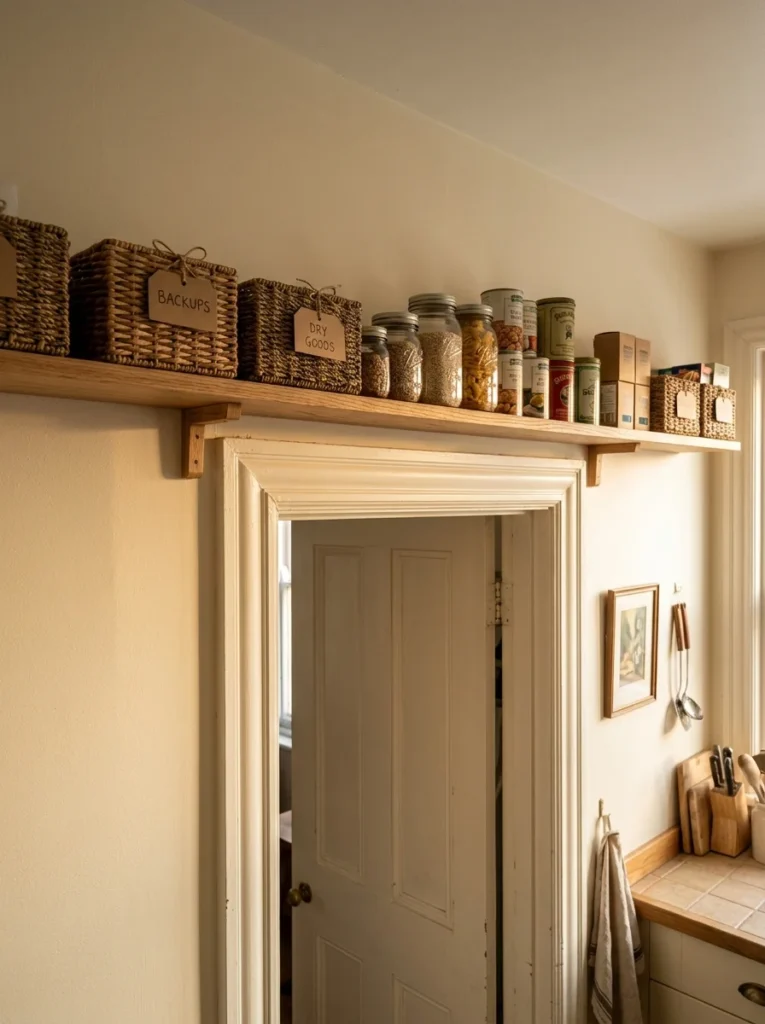
The wall above a kitchen doorway often sits unused, even though it can hold backup groceries. Install one sturdy shelf about 8 to 12 inches deep, leaving enough clearance for the door to open comfortably. A basic wood shelf and brackets can cost $30 to $65 from Home Depot or a local hardware store. Paint the shelf the same color as the wall if you want it to visually recede. Store rarely used items there, such as extra paper goods, unopened serving pieces, holiday baking supplies, or backup coffee. Use matching baskets with lids so the higher shelf doesn’t become a dusty collection of random packages. Check the weight rating of the brackets and anchor them properly. A shelf this high isn’t the place for heavy glass jars or a large bag of flour. Use a small folding step stool and keep it somewhere safe. Dust the shelf every few weeks with a microfiber cloth. This idea works particularly well in older kitchens where cabinet space is limited but wall height is generous.
11. Make a Freestanding Pantry From a Bookcase
A narrow bookcase can become a surprisingly useful pantry when cabinets are out of the question. Look for a unit around 12 inches deep and 24 to 30 inches wide, then add baskets and a simple curtain if you prefer hidden storage. A basic bookcase can cost $50 to $120, while thrift stores and Facebook Marketplace often have cheaper options. Secure the unit to the wall so it cannot tip, especially in a busy kitchen. Use the bottom shelves for heavier cans and appliances, middle shelves for everyday groceries, and the top for backup items. Add adhesive shelf liners if the surface is unfinished or difficult to wipe. If the bookcase is near a sink, paint it with a durable furniture paint and let it cure fully before loading it. A narrow unit in a warm wood finish works nicely in farmhouse kitchens, while painted white or charcoal suits a modern space. Measure your walking path before bringing it home. A pantry that steals six inches of walkway can make a small kitchen feel tighter than it really is.

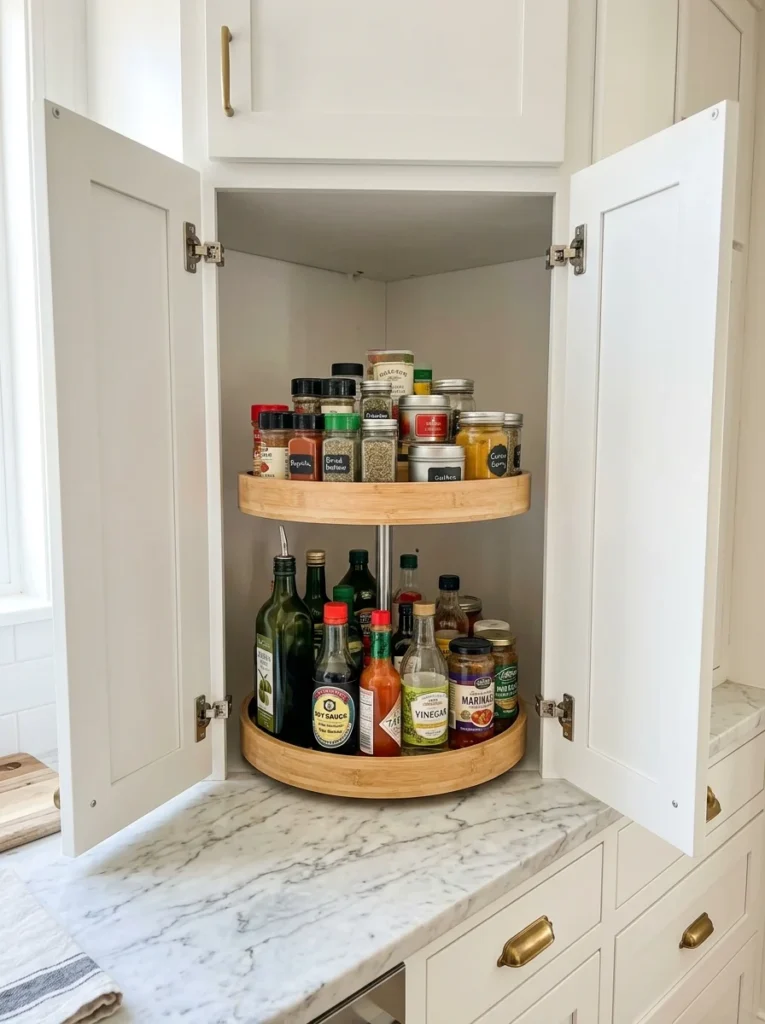
12. Use a Corner Cabinet Lazy Susan
Deep corner cabinets are notorious for hiding bottles and jars. A two-tier lazy Susan fixes that by bringing the back items forward with one spin. Most kitchen lazy Susans cost $15 to $40 for plastic or bamboo versions. Measure the cabinet before buying because corner openings vary considerably. A 12- to 18-inch diameter model works inside many cabinets, but don’t guess. Measure first. Use one level for sauces, oils, and vinegar, then keep the second for jars and smaller pantry staples. Avoid putting unstable glass bottles near the outer edge. If you store oil there, place the bottles on a washable silicone mat to catch drips. Clean the turntable with warm water and mild dish soap every few weeks. This is especially handy for renters because it doesn’t require permanent changes. A clear acrylic model keeps a modern kitchen looking light, while bamboo brings warmth to white cabinets. The goal isn’t to fill every inch. Leave enough space for each item to rotate smoothly without bumping the cabinet walls.
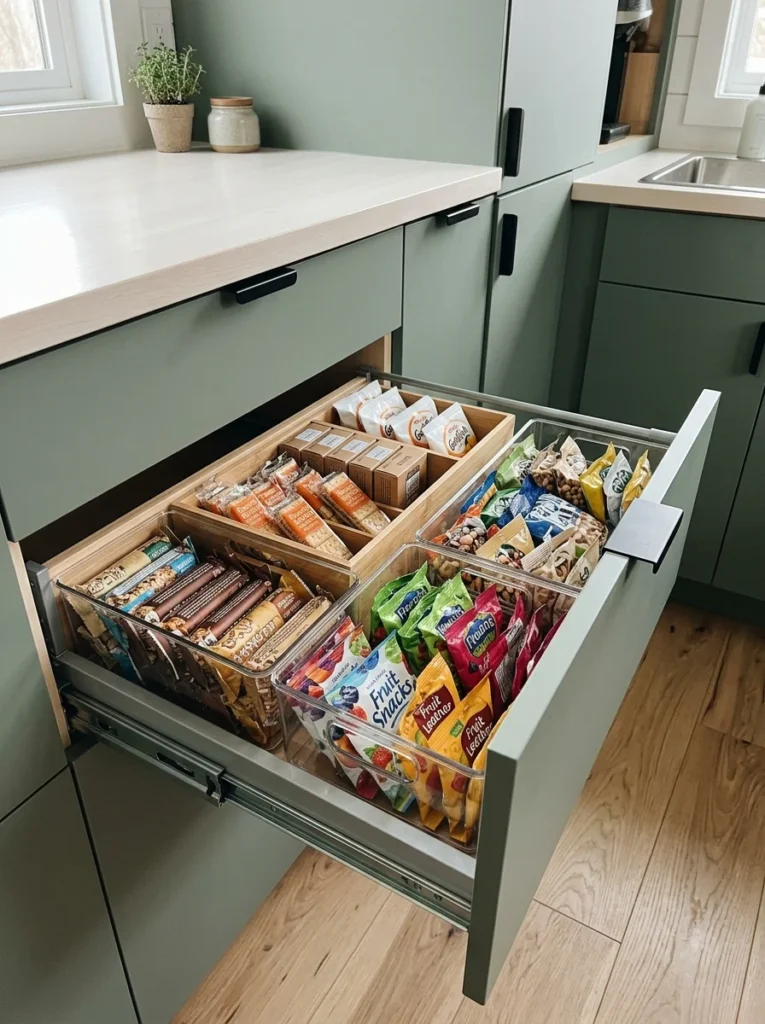
13. Turn a Lower Drawer Into a Snack Pantry
A deep lower drawer can work as a dedicated snack station, especially in a family kitchen. Remove the loose clutter and add several low bins so granola bars, crackers, fruit snacks, and small packages stay separated. Four simple plastic or bamboo bins can cost $20 to $35 at Target or Walmart. Choose bins about 3 to 5 inches high so you can see the contents without stacking food too deeply. Keep the most frequently grabbed snacks at the front and less-used treats behind them. Use clear bins if several family members need to see what is available. Wipe the drawer and bins every week because cracker crumbs collect quickly. If children use the drawer, avoid storing glass containers inside it. This setup also helps you see when snacks are running low, which makes grocery planning easier. A drawer pantry doesn’t have to look fancy. It just needs categories that make sense for your household. If your existing drawer is already crowded with utensils, move those to a shallow divider and give the deepest drawer to food instead.
14. Hang a Slim Rail for Pantry Baskets
A wall rail with small hanging baskets gives you storage without using floor space. Install the rail on an empty section of wall, then hang two or three baskets for onions, potatoes, snacks, or packaged food. A simple rail and basket setup costs around $25 to $60. Choose baskets with solid bottoms if you plan to store small packages. Keep produce in breathable metal or woven baskets rather than sealed plastic containers. For dry goods, wire baskets work well because crumbs can be shaken out easily. Install the rail into studs when possible, especially if the baskets will hold heavier groceries. Leave enough room underneath for cleaning and countertop use. If the wall is beside the stove, keep the baskets several inches away from heat and splattering oil. Black metal suits industrial or modern kitchens, while brass or natural wood looks softer. This idea works particularly well in narrow kitchens where cabinets already cover most of the wall. It also gives you a visible home for items that usually land on top of the refrigerator.

15. Use the Space Under a Staircase
If your kitchen sits near a staircase, the low triangular space underneath can become a custom pantry. Install shallow shelves that follow the slope, with taller storage toward the deepest part of the opening. A small DIY project can cost $100 to $300 in plywood, trim, paint, and hardware, depending on the size. Keep the lowest shelves for large bags, appliances, and bulk food, while shorter shelves near the top can hold jars or baking supplies. Paint the interior a light color so the shelves don’t feel like a dark closet. Add a small battery-powered motion light if the area has no wiring. Store food in sealed containers and keep the floor clear enough to vacuum. If the staircase is exposed to dampness, check the space regularly for moisture before storing flour or grains there. This is a more involved project than adding a cart, but it makes use of square footage that often has no other purpose. A simple framed door can also hide the pantry when you want a cleaner view from the kitchen.

16. Add Magnetic Containers to the Refrigerator Side
The side of a refrigerator is a useful vertical zone for lightweight pantry items. Attach magnetic spice tins, small hooks, or magnetic baskets to the exposed side panel. A set of six magnetic containers usually costs $15 to $30. Use them for seasoning packets, tea, small baking decorations, measuring spoons, or frequently used spices. Keep the containers light enough that they stay securely attached when the refrigerator door moves. Labeling isn’t necessary if the lids are clear, but a tiny removable label can help with similar-looking spices. Wipe the refrigerator side before mounting the containers so dust and grease don’t weaken the magnets. This setup works best on a smooth metal refrigerator surface. Some stainless-steel models are not magnetic, so test the surface first. Avoid storing anything heat-sensitive there if the refrigerator side becomes warm during normal operation. A clean row of small tins looks much better than a crowded refrigerator door covered with random notes and magnets, and it keeps commonly used ingredients within arm’s reach while cooking.

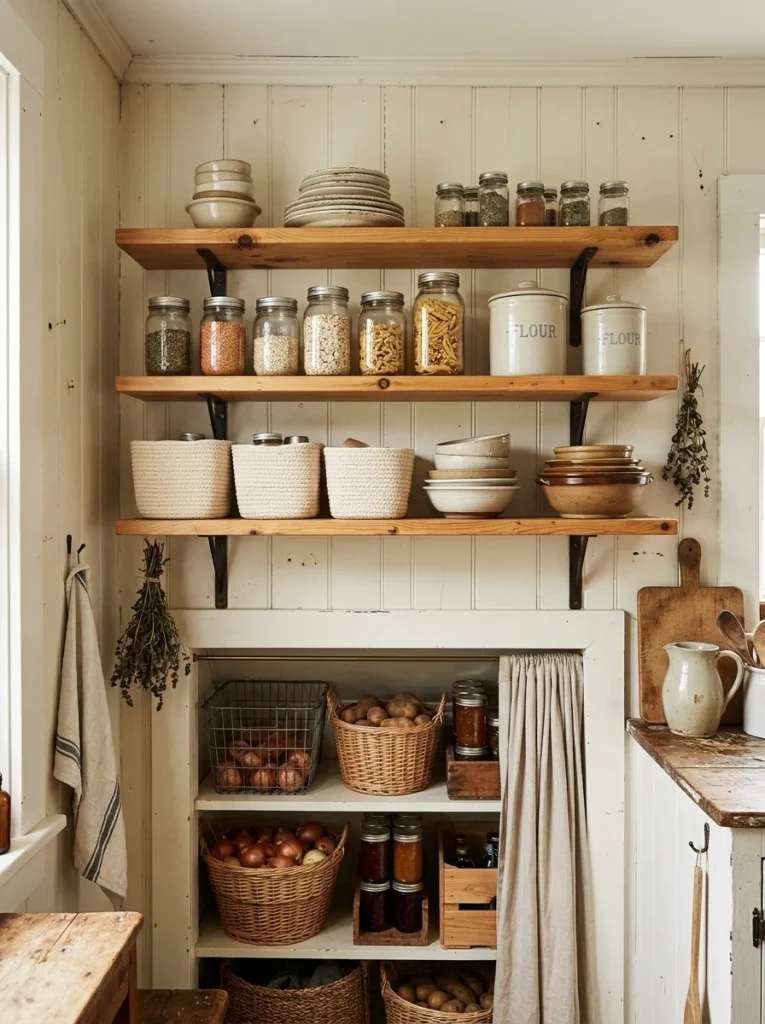
17. Create a Pantry Nook Under Open Shelves
Open shelves don’t have to be limited to dishes. The lower portion can become a small pantry nook with matching baskets and containers. Install two or three shelves at least 10 inches deep, then place labeled bins underneath for flour, snacks, baking supplies, or packaged foods. A three-shelf setup can cost around $50 to $120 using basic pine boards and brackets. Leave roughly 12 to 14 inches between shelves for practical food storage. Choose baskets with handles so you can pull an entire category down instead of moving five packages. Keep dry goods in sealed containers if the kitchen gets humid. Dust open shelves weekly, especially if they’re near the stove. For a cleaner look, use one basket size on the lower shelf and reserve the upper shelf for attractive jars. A warm white wall with natural wood shelves works well in small farmhouse kitchens, while black brackets and walnut boards give a modern kitchen more contrast. The trick is limiting the number of items on display. Open storage works best when every object has a defined home.
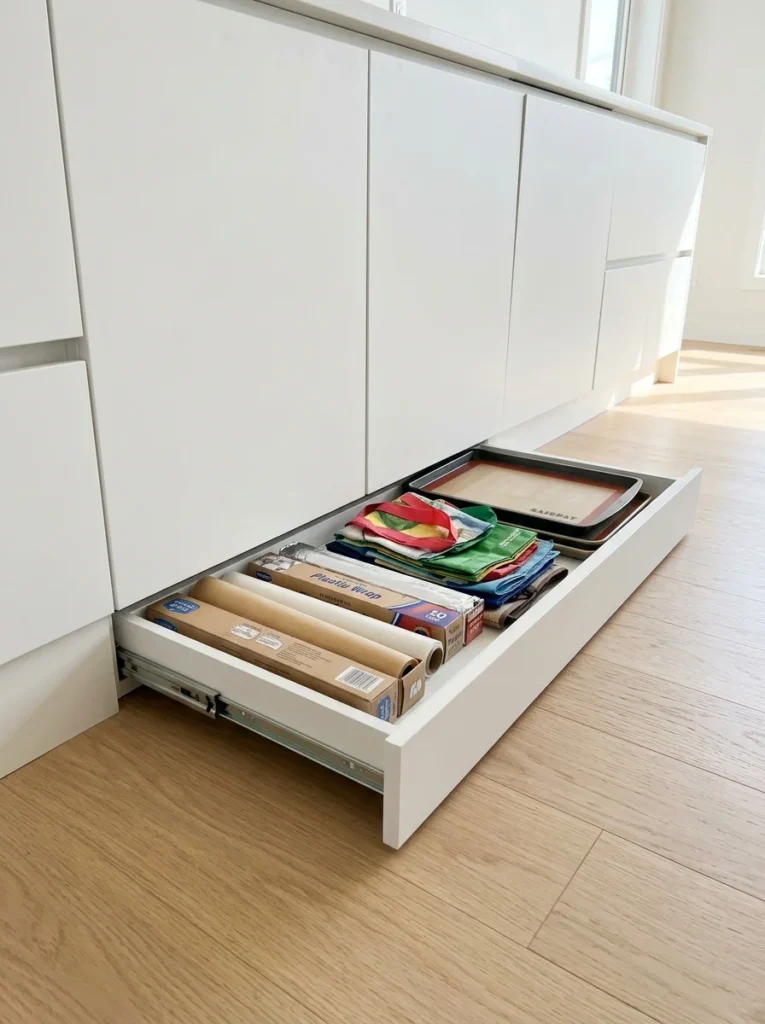
18. Install a Toe-Kick Drawer for Flat Pantry Items
That strip of space beneath lower cabinets can become a shallow drawer for flat or rarely used kitchen supplies. Toe-kick drawers are particularly useful for parchment paper, foil, reusable bags, placemats, baking trays, and unopened napkins. A basic retrofit kit can cost about $50 to $120 per drawer, before labor if you hire someone. The drawer should remain shallow because the toe-kick area usually offers only a few inches of height. Keep the front flush with the existing cabinet base for a built-in appearance. Use dividers so rolls and flat items don’t slide around. Since the drawer sits close to the floor, wipe it out every month and avoid storing loose food directly inside. This is a project better suited to homeowners or a skilled handyman because cabinet bases may need to be cut and reinforced. If you rent, skip the construction and use a low rolling bin instead. The storage isn’t huge, but it frees a regular drawer from awkward flat items that take up valuable vertical space.
19. Use a Small Pantry Cabinet From IKEA
A narrow IKEA cabinet can give you a proper pantry feel without the price of custom cabinetry. Look for a tall unit that is around 12 to 15 inches deep, then add adjustable shelves and small bins to suit your grocery habits. Expect roughly $100 to $250 for a basic cabinet and interior accessories, depending on the collection and size. Anchor the cabinet to the wall, especially if it is tall and narrow. Keep heavy cans low and lighter cereal, baking goods, and snacks higher up. White is an easy match for most kitchens, while pale oak tones add warmth to rooms with wood flooring. Use shelf liners on shelves holding flour or sugar so small spills are easy to wipe away. Don’t pack every shelf completely full. Leave a little breathing room so containers can slide out without knocking into each other. A tall cabinet is especially useful in apartments because it gives you vertical storage without requiring a kitchen remodel. Measure the door swing and walkway before ordering so the cabinet doesn’t interfere with nearby appliances.

20. Put a Slim Cabinet Beside the Dining Area
If the kitchen itself has no room for another cabinet, borrow a little space from the nearby dining area. A narrow cabinet 12 to 16 inches deep can hold pantry overflow without making the kitchen footprint smaller. Look for cabinets around $80 to $200 at IKEA, Target, or Facebook Marketplace. Choose a piece that resembles your kitchen cabinets or dining furniture so it feels intentional. Store backup groceries, serving supplies, paper products, and small appliances inside. Add adjustable shelves so you can change the spacing for different items. Keep food in airtight containers, particularly if the cabinet is near a warm window. A cabinet with doors is better than open shelving here because it keeps the dining area looking calmer. Measure the clearance around chairs before buying. You want people to sit down without bumping the cabinet every time they pull out a chair. This setup is a good choice for older homes with small kitchens because it creates a pantry zone nearby without touching the original cabinetry.

21. Make a Baking Pantry in One Upper Cabinet
Baking supplies are easier to manage when flour, sugar, cocoa, sprinkles, and measuring tools live together. Choose one upper cabinet and fit it with two or three adjustable shelves or small risers. A set of shelf risers and airtight containers costs about $25 to $50. Store flour and sugar in wide containers that are easy to scoop, then use small jars for sprinkles, baking powder, spices, and decorating supplies. Keep measuring cups in a shallow bin so they don’t disappear behind ingredients. Wipe the cabinet every few weeks because flour dust settles on shelf corners. Check expiration dates on baking powder, yeast, and extracts twice a year. A simple label showing the ingredient name and purchase date helps if you buy ingredients in bulk. If you bake often, place the baking cabinet close to your main work surface. If you bake only occasionally, use a higher cabinet and reserve eye-level space for foods you reach for every day. This one-category pantry can make a tiny kitchen feel much easier to use.

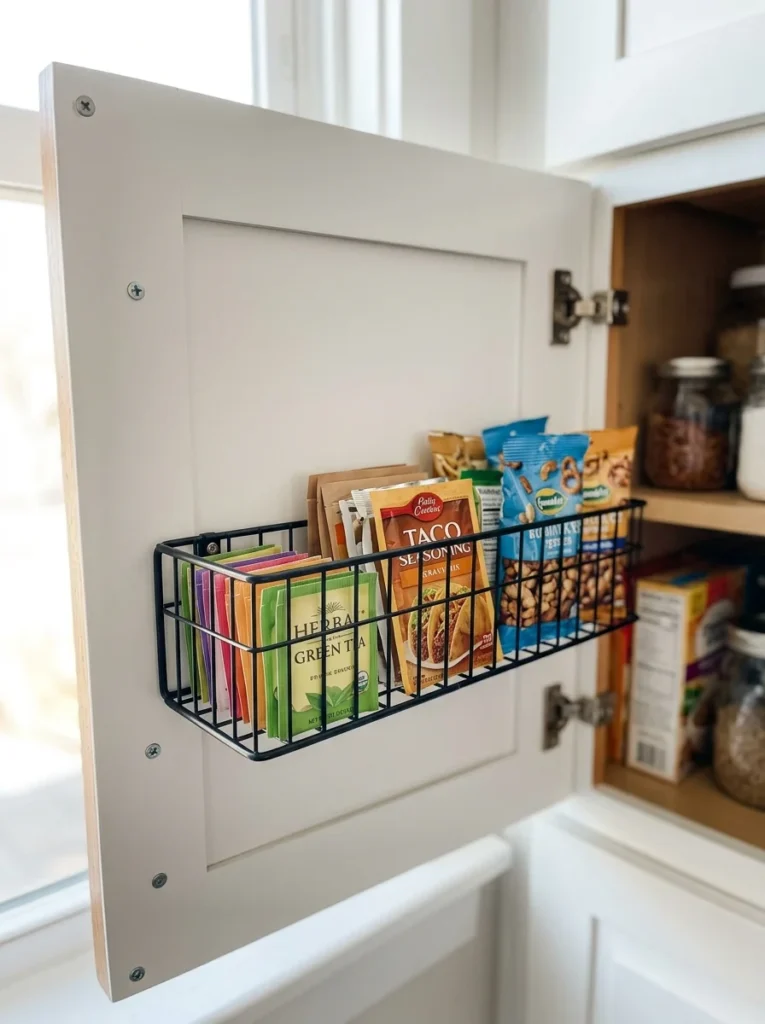
22. Add a Wire Rack Inside a Cabinet Door
A small wire rack mounted inside a cabinet door is perfect for items that don’t deserve a full shelf. Use it for packets of gravy mix, seasoning envelopes, tea, small bags of nuts, or unopened snack packs. A compact rack costs around $10 to $25 and can often be installed with a few screws. Before mounting it, check that the door has enough clearance from the shelves inside. Keep the rack shallow, ideally under 3 inches deep, so the door still closes properly. Metal baskets are easy to wipe clean and won’t absorb food odors. Group similar packets together in small reusable bags or bins so they don’t scatter. Avoid putting heavy glass jars on a door-mounted rack because the extra weight stresses hinges. If you don’t own the cabinets, an over-the-door adhesive organizer is a simpler rental option, although it won’t hold as much. This is a small project with a very specific purpose, and that makes it useful. Tiny storage works best when it solves one annoying problem instead of trying to hold everything.
23. Use Matching Bins on the Top Shelf
The highest pantry shelf is often where forgotten groceries go to disappear. Use matching bins with handles so you can pull down an entire category without standing on tiptoe and moving individual packages. Three to five medium bins usually cost $25 to $50 at Target, Walmart, or Amazon. Choose sturdy plastic for heavier pantry goods or woven baskets for lightweight items. Keep one bin for baking extras, another for backup snacks, and another for specialty ingredients. Don’t put everyday foods on the top shelf unless your household can safely reach them. A small step stool with a wide base is safer than standing on a chair. Wipe plastic bins with warm soapy water when you clean the pantry, and vacuum crumbs from woven baskets. Avoid overfilling them because a heavy bin is awkward to lift overhead. This simple system makes high storage useful without turning it into a dumping ground. It also lets you use shelf height that otherwise sits empty for months.

24. Convert a Linen Cabinet Near the Kitchen
Sometimes the best pantry is not technically inside the kitchen. An unused linen cabinet in a nearby hallway can store shelf-stable food if the location is dry, cool, and clean. A few storage bins and shelf liners can cost $20 to $45. Remove old linens, clean every shelf with mild soap, and let the cabinet dry completely before moving food inside. Use the upper shelves for backup paper products and the middle shelves for packaged groceries. Keep food away from cleaning chemicals, toiletries, and anything with a strong fragrance. Clear containers work well for rice, pasta, and cereal, while closed bins are better for snacks. Add a simple category system so everyone knows where items belong. If the cabinet is farther from the cooking area, reserve it for backup supplies rather than ingredients you use several times a day. This is particularly helpful in small homes where kitchen cabinets are already packed. For a renter, the only changes required are removable shelf liners and containers, so you can take the whole setup with you later.

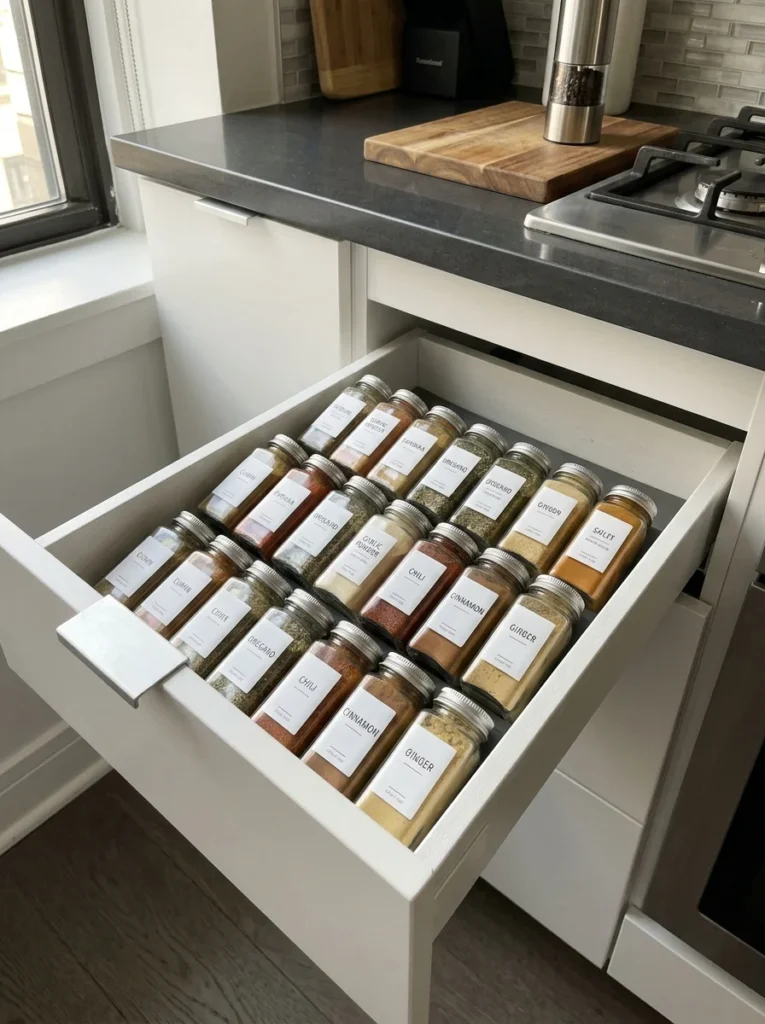
25. Install a Narrow Spice Drawer
A spice drawer can be much easier to use than a crowded shelf. Choose a shallow drawer near the cooking area and arrange spice jars in rows with labels facing upward. A drawer insert usually costs $15 to $35. Measure the drawer’s inside dimensions before buying one because even a half-inch difference can make an insert unusable. Use matching jars if you like a uniform look, but the original spice containers work perfectly well. Group spices by how you cook rather than alphabetically, such as baking spices, everyday seasonings, and specialty blends. Wipe the drawer and jars every month because spice dust settles around lids. Check dates once or twice a year and replace anything that has lost its aroma. Keep the drawer away from direct heat from the oven or cooktop because temperature changes can affect spices. A shallow drawer also prevents jars from hiding behind one another. Once everything is laid flat and visible, you’ll stop buying a second jar simply because the first one was buried at the back.
26. Give Potatoes and Onions a Ventilated Home
Potatoes and onions often end up taking over a corner of the pantry because they need space and airflow. Use two separate ventilated baskets or bins on a lower shelf. A pair of metal or wire baskets costs around $20 to $40. Keep potatoes and onions separate because storing them together can shorten their storage life. Choose a cool, dark area away from the stove, dishwasher, and direct sunlight. Wire baskets are easy to shake out and wipe, while wooden crates add a farmhouse touch. Check the produce once a week and remove anything soft or spoiled before it affects the rest. Don’t seal potatoes in airtight plastic containers because trapped moisture encourages problems. A lower pantry shelf works well because these foods are heavy and don’t need eye-level space. If your pantry is extremely small, a two-tier vertical basket can save floor area, but leave enough room around each basket for airflow. Giving these bulky staples their own zone keeps them from stealing valuable shelf space from cans and packaged food.

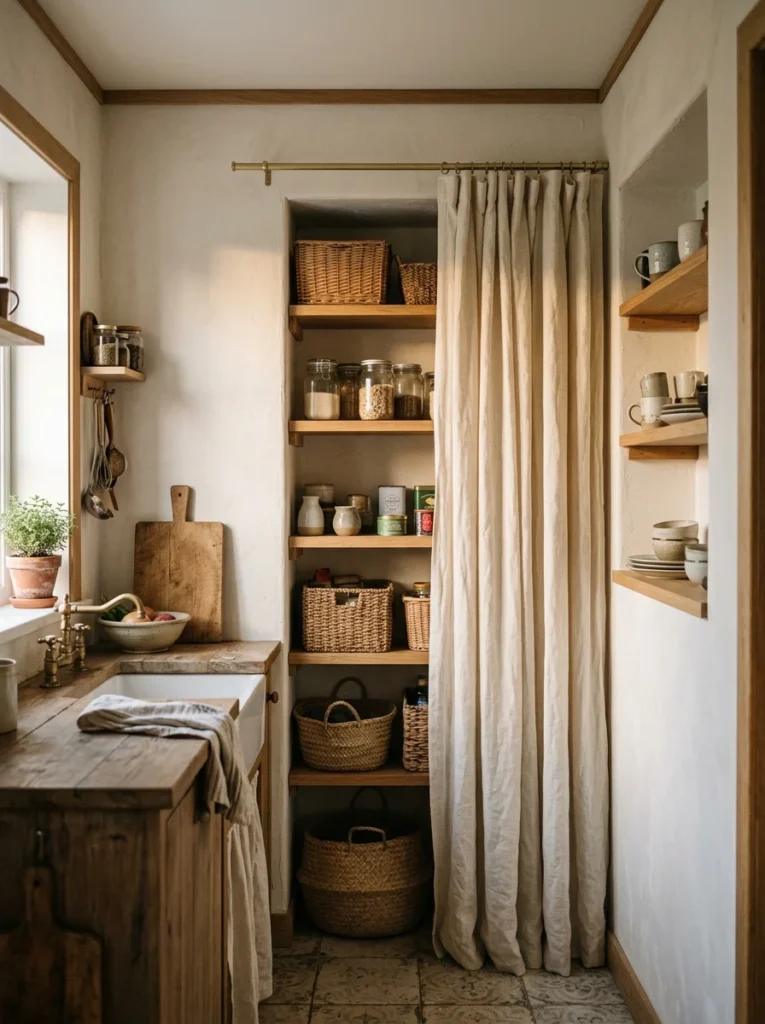
27. Add a Hidden Pantry Behind a Curtain
A shallow open shelving unit doesn’t have to remain visible. Hang a simple café curtain or full-height fabric panel across the front to hide pantry supplies when the kitchen feels busy. A tension rod and washable curtain can cost $20 to $45. Choose cotton or linen-look fabric in a neutral shade such as cream, oatmeal, or soft gray. Keep the shelves no deeper than about 12 inches so the curtain hangs neatly without bulging. Inside, use matching bins for packaged food and clear containers for dry goods. Wash the curtain regularly if it hangs near the stove, and choose fabric that can handle machine washing. Keep the rod away from heat and splattering oil. This approach is especially useful for renters because it doesn’t require a cabinet installation. It also works when you have a pantry shelf in a dining area that you don’t want visible during meals. The curtain should hide the storage, not create another visual problem, so avoid bold patterns in an already busy kitchen. A simple fabric panel usually looks calmer and costs less.
28. Create a Compact Grocery Restock Zone
A tiny pantry gets much easier to manage when you separate everyday food from unopened backups. Dedicate one shelf or cabinet section to restock items such as extra pasta, canned tomatoes, cereal, coffee, and paper goods. Three medium stackable bins can cost around $20 to $35. Put new groceries behind older ones so older packages get used first. Keep one small notepad or reusable shopping list nearby if you like tracking what is running low. Don’t overbuy simply because an item is on sale. In a small kitchen, a six-month supply of cereal takes up more useful space than it saves money. Check the restock zone every week before grocery shopping. Wipe shelves before putting away a new batch of food, especially after packages leak or shed crumbs. This system works particularly well for households that buy warehouse-size packages but don’t have warehouse-size kitchens. If the backup shelf gets full, that’s your signal to pause grocery extras until you use some of what is already there.

29. Use a Small Antique Cabinet for Character and Storage
A thrift-store cabinet can become a charming pantry when a standard modern cabinet feels too plain. Look for a narrow wood cabinet with adjustable shelves, solid doors, and a footprint around 12 to 18 inches deep. Thrifted cabinets often cost $40 to $100, and a little sanding and paint can make one fit your kitchen beautifully. Clean the interior thoroughly, repair loose hinges, and use a low-VOC furniture paint if you want a new color. Add removable shelf liners so spills don’t stain the wood. Store dry goods, jars, snacks, or backup supplies inside, keeping heavy items on the bottom. If the cabinet is tall, anchor it securely to the wall. Avoid using an old piece if it smells strongly of mildew or has signs of water damage. A soft sage green, warm white, or natural wood finish pairs nicely with modern kitchens and gives a small room some personality. This is also a smart Facebook Marketplace search because older cabinets are often much cheaper than purpose-built pantry furniture.

Mistakes That Ruin the Look
- Buying storage before measuring: Measure cabinet width, depth, height, door clearance, and shelf spacing first. A storage bin that is two inches too deep can make an entire cabinet frustrating to use.
- Packing shelves too tightly: Leave a little space around containers so you can remove one item without knocking over three others. A pantry should be easy to use, not just neat for a photograph.
- Ignoring weight: Heavy cans belong on low shelves. Tall narrow cabinets and bookcases should be anchored to the wall.
- Using open storage for everything: Open shelves collect dust and visual clutter. Keep everyday attractive items outside, while backup groceries and messy packages can live in baskets or closed cabinets.
Frequently Asked Questions
Q: What are the best tiny kitchen pantry ideas for very small kitchens?
A: Start with vertical storage, a narrow rolling cart, or a pull-out cabinet. These options use height and unused gaps without taking much floor space.
Q: How deep should a small kitchen pantry be?
A: Around 10 to 15 inches is practical for many compact kitchens. Shallow shelves keep food visible instead of creating a second row of forgotten groceries.
Q: How much does it cost to add a tiny pantry?
A: A simple cart or shelf can cost $20 to $60, while a narrow cabinet often runs $80 to $250. Custom pull-outs and built-ins cost more.
Q: What should go on the highest pantry shelf?
A: Use upper shelves for backup groceries, holiday baking supplies, paper goods, and items you rarely reach for. Store heavy cans and everyday ingredients lower down.
Q: Are open shelves a good idea for a small pantry?
A: Yes, if you keep categories limited and use matching baskets or containers. Closed cabinets are better for foods that create visual clutter or collect dust easily.
Q: How can renters add pantry storage without drilling?
A: Use rolling carts, tension shelves, over-the-door organizers, freestanding cabinets, and removable shelf liners. These options can move with you when your lease ends.
Start With the Smallest Win
You don’t need to remodel your kitchen to gain useful pantry space. Start with the awkward spot that annoys you most, whether that’s the gap beside the refrigerator, a crowded cabinet, or an empty wall. A $25 rolling cart, a few bins, or one narrow shelf can make a real difference this weekend. Pick one of these tiny kitchen pantry ideas, measure before buying anything, and give every food category a clear home. Once that first area works, the rest of the kitchen becomes much easier to organize.