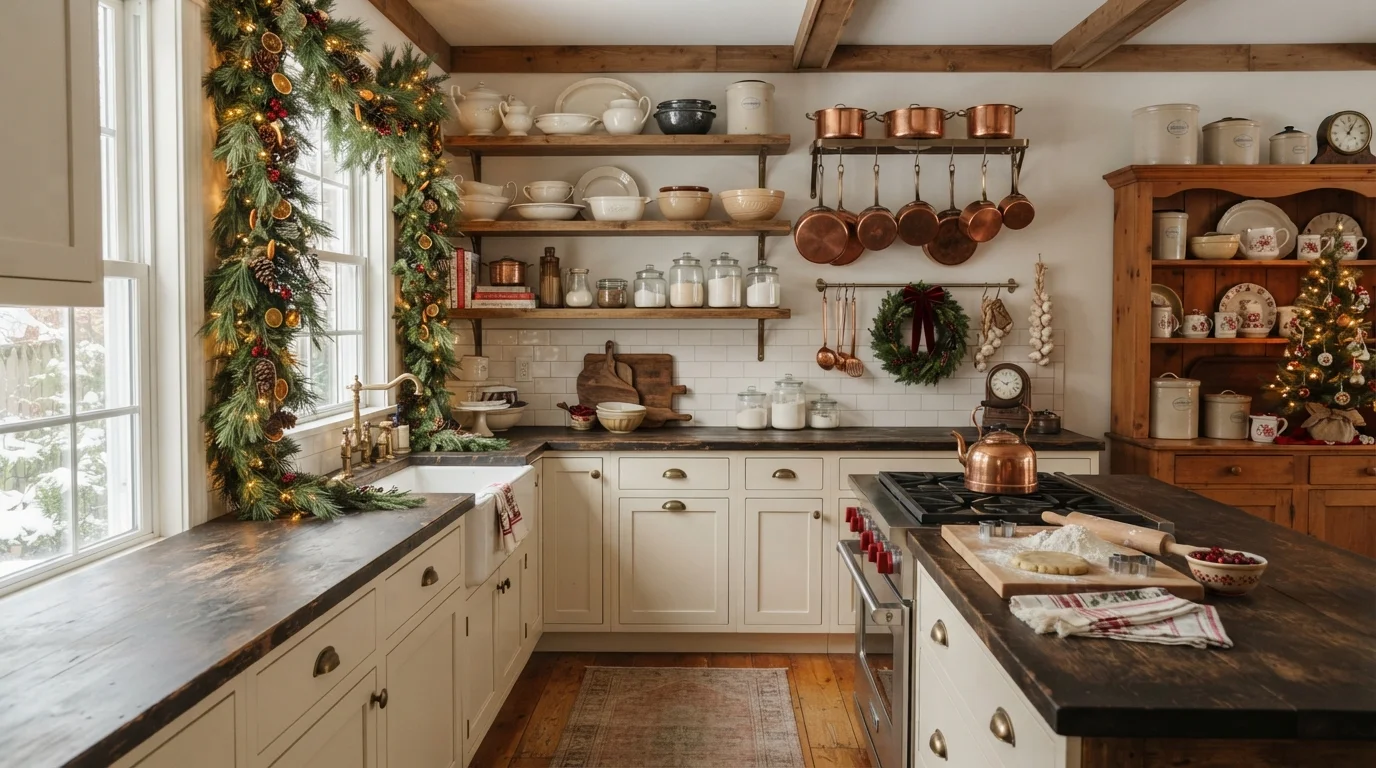

A kitchen can get festive without becoming a maze of ribbons and ornaments. In fact, some of the prettiest holiday kitchens use only a few old-fashioned details, such as a red enamel bowl, a little evergreen, vintage linens, and warm lighting. That’s especially helpful if your counters are already packed.
Vintage Christmas kitchen decor combines traditional holiday colors with old-fashioned kitchen pieces, natural greenery, wood, brass, enamelware, plaid textiles, and warm lighting. The easiest approach is to decorate useful areas first, then add small seasonal details to open shelves, windows, counters, and dining nooks.
You don’t have to buy a matching Christmas collection. A thrifted crock beside a grocery-store pine branch can look more charming than an expensive coordinated set. The goal is a kitchen that still feels like a kitchen, just a little more nostalgic in December.

Want the full Fall & Christmas Decorating Planner?
16 pages — color palettes, room-by-room checklists, DIY projects, shopping lists and more. Instant PDF download.
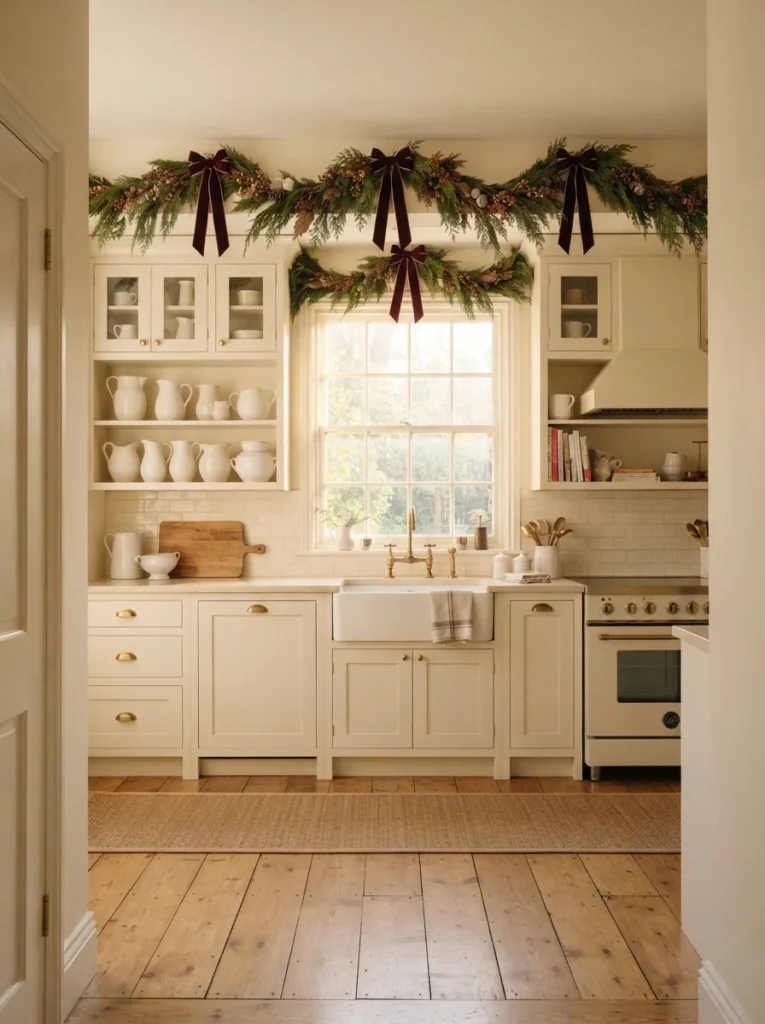
Get the Planner — $91. Drape Cedar Across the Upper Cabinets
Cabinet tops are one of the easiest places to add holiday character without giving up counter space. Lay a 6 to 8-foot faux cedar garland across the upper cabinets and let the ends hang down slightly near the corners. Add four 3-inch burgundy velvet bows at evenly spaced points rather than covering every cabinet with ribbon. Target, Walmart, and Amazon usually carry faux cedar garlands between $12 and $30. If your cabinets are white or cream, the dark green will create enough contrast on its own. Secure the garland with removable hooks or small clips that won’t damage the finish. For a real greenery version, use cedar or pine from a local garden center, but keep it away from heat sources and replace it once it becomes dry. Dust faux greenery with a handheld vacuum on its lowest setting before storing it. This simple arrangement works especially well in smaller kitchens because the decoration stays high and leaves your counters completely usable.

2. Turn the Coffee Station Into a Christmas Corner
If you have a coffee maker sitting on the counter all year, give that little zone a seasonal personality. Hang a 10-inch evergreen wreath above the coffee shelf or backsplash, then arrange red mugs, a small ceramic sugar bowl, and one brass spoon holder nearby. A striped or cranberry-colored tea towel adds another layer without taking up room. You can find red mugs for $3 to $6 each at Target or Walmart, while thrift stores are great for older brass containers and small trays. Keep the coffee machine itself clear so steam and heat don’t damage nearby decorations. A tiny bowl of cinnamon sticks also adds a traditional holiday detail without relying on artificial fragrance. I like this approach because it changes a useful corner rather than creating another decorative surface that has to be cleared every morning. Wipe the shelf and mugs regularly because coffee grounds and dust show quickly against darker holiday colors.
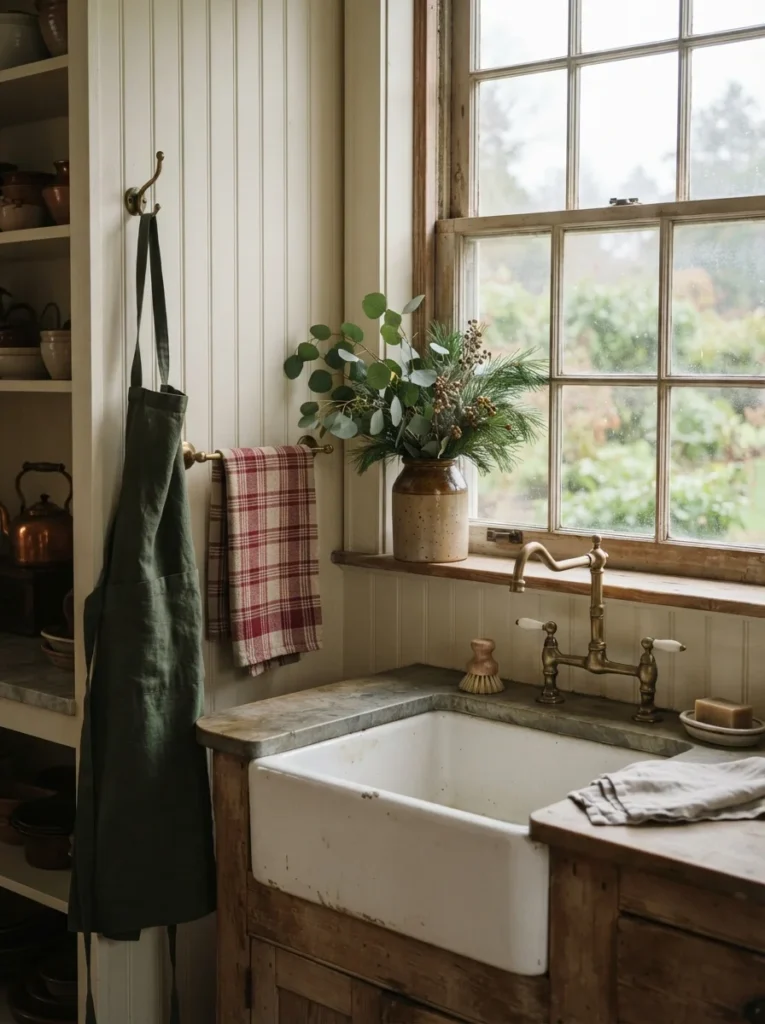
3. Hang a Plaid Kitchen Apron by the Sink
A Christmas kitchen doesn’t require decorations on every cabinet. Sometimes one textile is enough. Hang a cranberry, forest-green, or red plaid apron from a brass hook beside the sink, then place a small antique crock filled with pine and eucalyptus underneath. A 28-by-32-inch apron is large enough to act as a noticeable accent while still being practical for baking. Look at Target, Walmart, or Amazon for options around $12 to $25. Thrift stores can also turn up vintage aprons with much more character, although it’s smart to wash them before use. Keep the apron away from the stovetop so the fabric doesn’t become a fire hazard. Wash cotton or linen versions according to the care label and let them dry fully before storing. This idea works particularly well in compact kitchens because the color goes vertical instead of consuming counter space. It also gives the room that old-fashioned working-kitchen feeling that makes vintage holiday decorating so appealing.
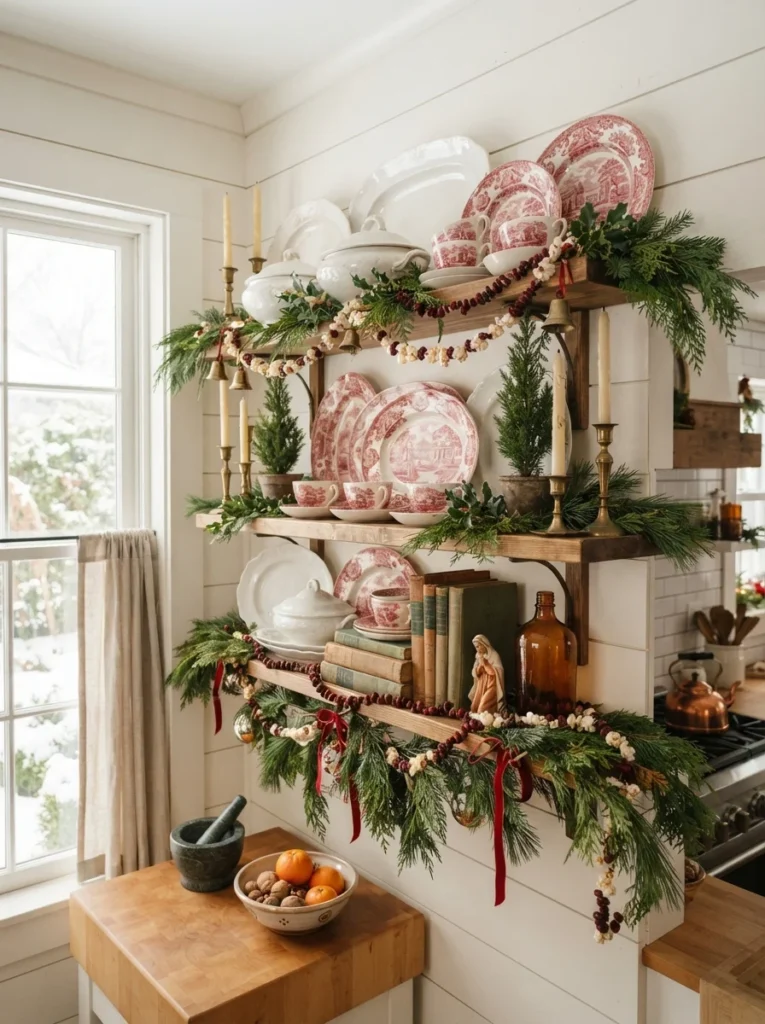
4. Style Open Shelves With Red Transferware
Open shelving gives you a perfect excuse to bring out the dishes you normally keep tucked away. Group red transferware plates with cream ironstone, old cookbooks, brass candlesticks, and a few short pine branches. Keep the heavier plates toward the bottom shelf and lighter pieces higher up. Use three to five red pieces per 36-inch shelf so the display has color without looking like a Christmas store. Thrift shops often have transferware plates for $4 to $10 each, and they don’t have to match perfectly. Slight differences in patterns actually give the collection more personality. Check that older dishes are food-safe before using them for serving, especially if you’re unsure of their age or glaze. Dust shelves before decorating, then wipe dishes with a soft cloth throughout the season. This is one of the easiest ways to create a vintage kitchen atmosphere because your everyday storage becomes part of the holiday display.
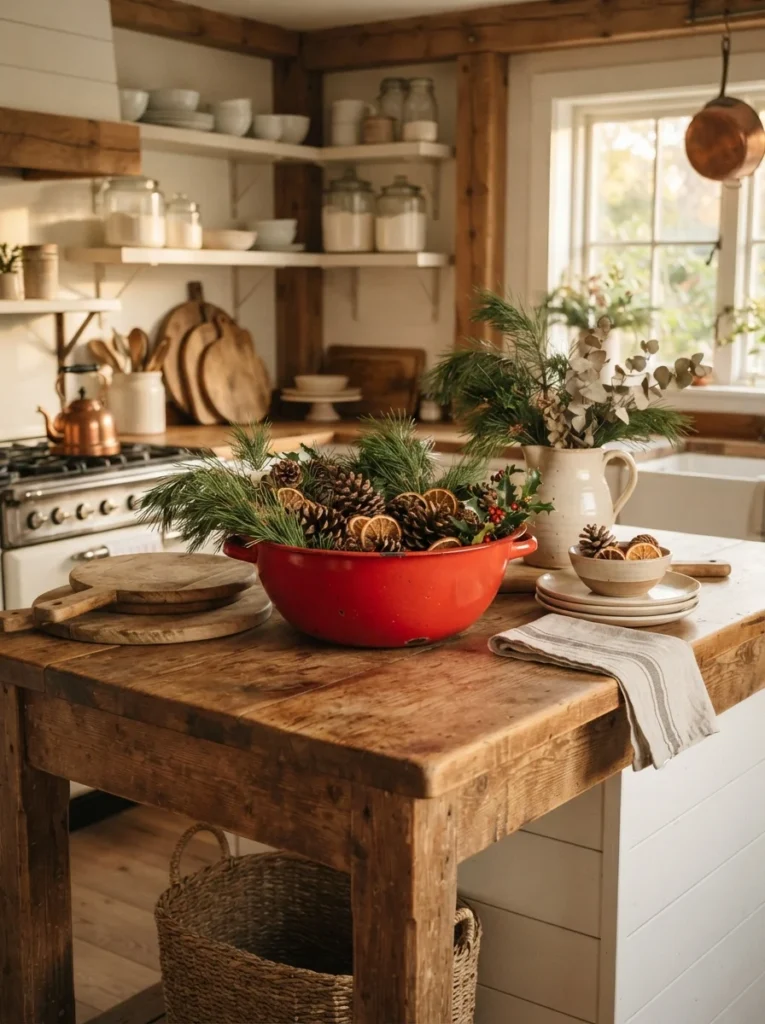
5. Put a Red Enamel Bowl on the Island
A large red enamel bowl can carry an entire kitchen display by itself. Set one in the center of the island and fill it with cedar clippings, pinecones, dried orange slices, and a few cinnamon sticks. A 12 to 14-inch bowl gives you enough surface area for a full arrangement without taking over a standard island. Walmart and Target often have enamel-style bowls around $15 to $30, while vintage versions are worth checking for at flea markets. Don’t fill the bowl so high that it blocks the view across the island. If you’re using fresh greenery, place a shallow waterproof dish inside the bowl first. Wipe enamelware with a soft sponge and mild soap, then dry it thoroughly to prevent rust around chips or exposed metal. The red bowl adds traditional holiday color, while the wood, citrus, and greenery keep the display grounded and natural. It also remains useful after Christmas, which makes it a better buy than a decoration you’ll only use once a year.
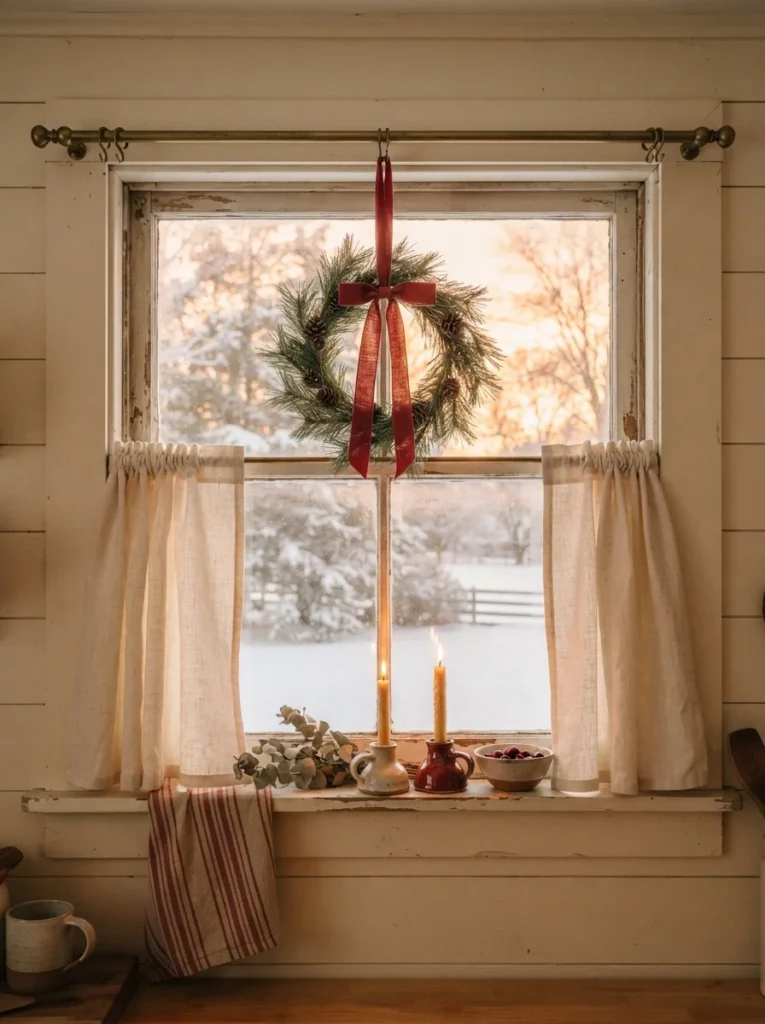
6. Hang a Small Wreath in the Kitchen Window
Kitchen windows are often overlooked during holiday decorating, yet they provide a natural focal point. Hang an 8 to 12-inch pine wreath from the center of the glass using a clear suction hook or removable hanger. Tie a narrow burgundy ribbon around the top and let the tails fall about 8 inches. A simple faux wreath costs roughly $8 to $18 at Walmart or Target. For a more traditional appearance, choose cedar, boxwood, or pine rather than glitter-covered greenery. Keep the sill mostly open so you can still clean around the window and operate any blinds. If you’re using fresh greenery, check it every few days and remove it once it starts becoming dry. A wreath like this looks especially pretty against white or cream curtains because the green and red stand out clearly. It also works in a rental, since you can remove the hanger after Christmas without changing the wall or window frame.

7. Add Greenery Around a Wooden Bread Box
The bread box is already part of the kitchen, so let it become part of the Christmas styling too. Place a small bundle of cedar or pine behind it, then drape one narrow red-and-cream striped towel over the side. Add a cream ceramic pitcher or brass measuring cups beside the arrangement. A 6 to 10-inch greenery bundle is plenty for a small counter. You can buy a faux pick for $4 to $8 at a craft store, or clip a few branches from suitable fresh greenery. Keep the arrangement away from the toaster and stovetop, where heat can dry natural branches quickly. A wooden bread box usually costs $25 to $50 new, but thrift stores often have older versions for much less. Clean the box with a slightly damp cloth and dry it immediately. This idea works because it decorates an item you already use rather than asking you to surrender another section of counter to holiday objects.

8. Create a Tiny Holiday Wall Gallery
An empty kitchen wall doesn’t require a huge seasonal sign. Hang two or three vintage-style botanical prints, then add a small wreath or a few old kitchen tools between the frames. A three-frame arrangement about 24 inches wide works nicely above a narrow counter or breakfast nook. Thrift stores often have wooden frames for $3 to $10, while printable botanical artwork is inexpensive to frame yourself. Look for muted greens, cream, brown, and touches of burgundy instead of bright modern graphics. A wooden spoon or old rolling pin can hang from brass hooks beneath the artwork, tying the display back to the kitchen. Dust the frames with a dry microfiber cloth and keep paper prints away from direct splashes. This is a useful option for renters because it creates visual interest on a blank wall without requiring a large permanent installation. It also gives your vintage Christmas kitchen decor a little more personality than a collection of generic holiday signs.

9. Make the Baking Station Part of the Decor
If you bake during the holidays, don’t hide every useful tool away. Arrange cream mixing bowls, a wooden rolling pin, brass measuring cups, and one red gingham towel together on a small tray. Add two short evergreen sprigs and a ceramic jar filled with wooden spoons. A 14-by-18-inch tray keeps everything contained and makes the setup easy to move when you need more counter space. IKEA and Target have simple wooden trays around $10 to $20, while vintage trays are easy thrift-store finds. Keep food-contact surfaces clean and wash the bowls before using them for actual baking. Avoid placing fresh greenery directly beside dough or uncovered ingredients. The charm here comes from making ordinary baking equipment part of the holiday scene. A bowl of cookie cutters or a jar of cinnamon sticks adds another practical detail without creating clutter. Your kitchen stays functional, but it feels ready for a long afternoon of Christmas baking.
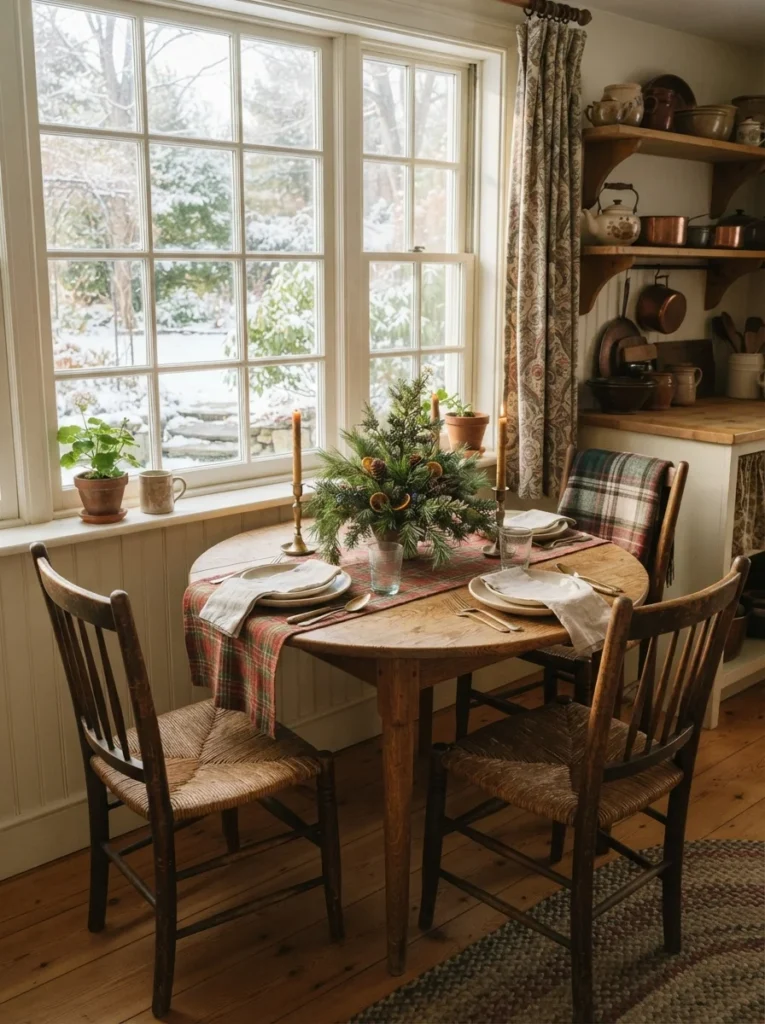
10. Give the Breakfast Table a Plaid Runner
A small breakfast table doesn’t have room for a giant centerpiece, and that’s exactly why a plaid runner works so well. Lay a cranberry or forest-green runner down the center, then place a shallow ceramic bowl filled with pinecones and cedar in the middle. Add two short ivory candles in brass holders. A 14-by-72-inch runner fits many 4- to 6-foot tables with enough overhang to look finished. Target and Walmart often have seasonal runners between $10 and $20. Wash cotton or polyester versions according to the care label and store them flat or loosely rolled. If your table is small, skip placemats and let the wood show around the runner. That little bit of empty surface keeps the arrangement from feeling cramped. The plaid provides a strong Christmas pattern, while the natural greenery prevents the red from looking too bright or overly themed.
Want the full Fall & Christmas Decorating Planner?
16 pages — color palettes, room-by-room checklists, DIY projects, shopping lists and more. Instant PDF download.
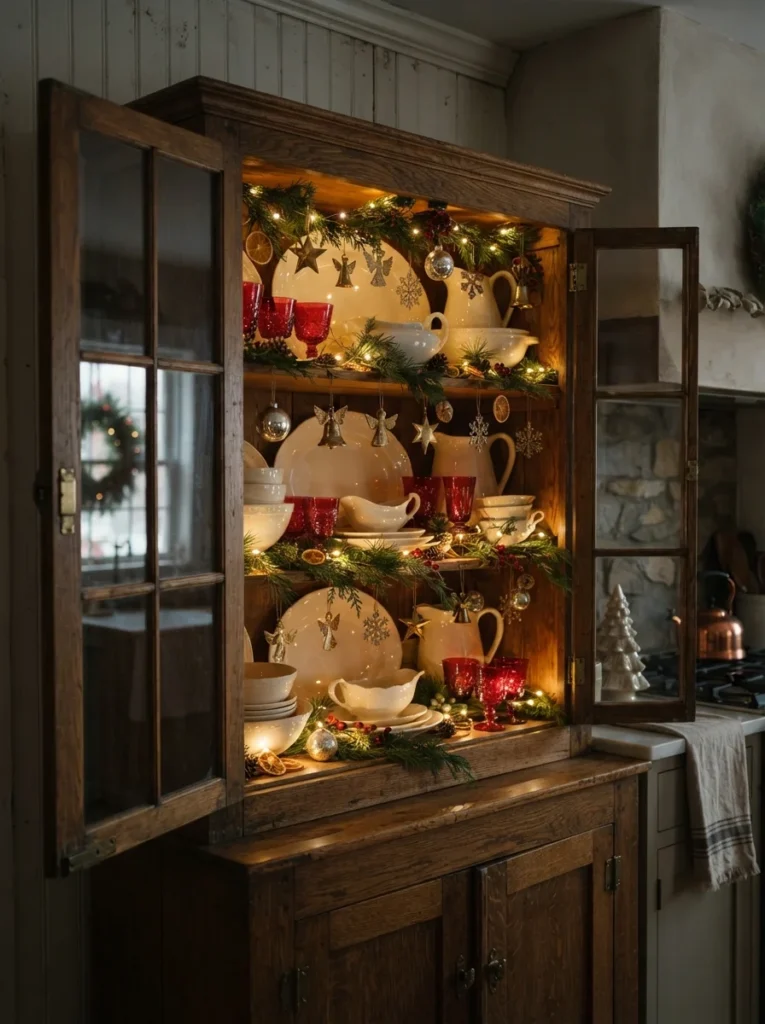
Get the Planner — $911. Tuck Tiny Lights Inside Glass Cabinets
Glass-front cabinets become beautiful at Christmas with almost no permanent decorating. Arrange your everyday cream dishes inside, then add a few cranberry-colored glasses and one 6-foot battery light strand around the back edge. Use warm white micro lights, not blue-white bulbs. Battery packs can be hidden behind dishes or on the top shelf if there’s room. Amazon and Target carry small light strands for around $8 to $15. Keep the lights away from water and inspect the wire before use. Don’t pack every shelf with ornaments. Two or three holiday details are plenty because the glass itself already creates visual interest. This works particularly well at night when the little lights glow through the dishes. Turn them off before bed and remove batteries during long periods of storage to prevent corrosion. The result is subtle during the day and much cozier after sunset, which is exactly what a Christmas kitchen should feel like.
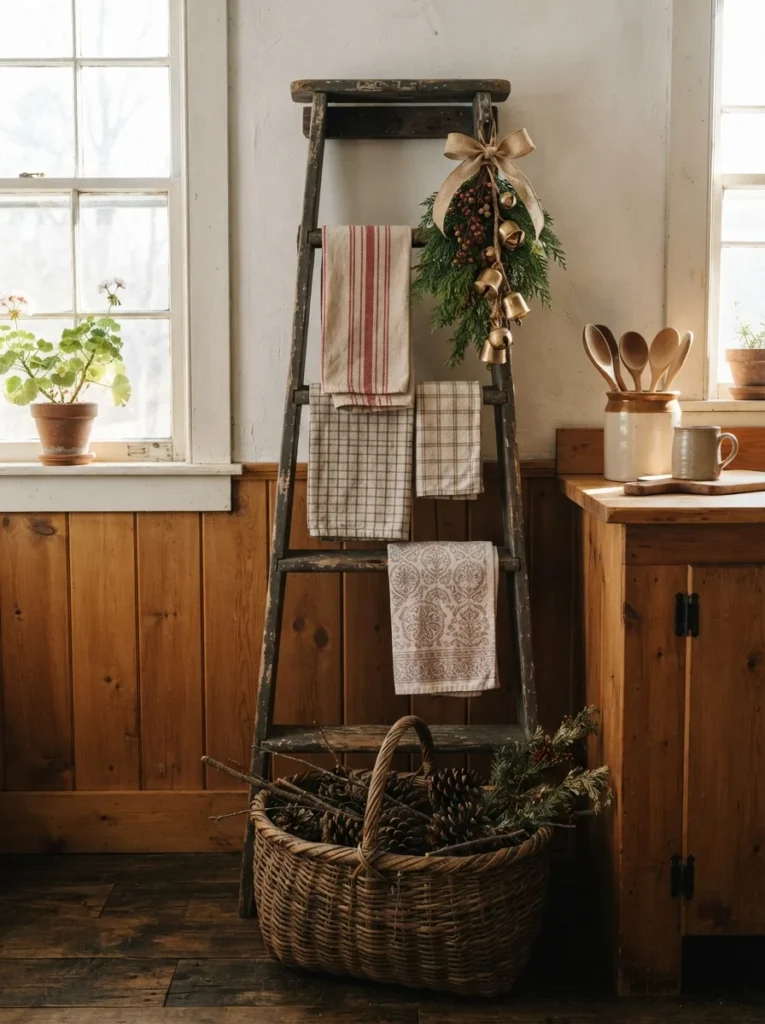
12. Hang Holiday Tea Towels on a Wooden Ladder
A narrow decorative ladder can turn an unused kitchen wall into a useful holiday display. Lean a 5-foot wooden ladder against the wall and hang two or three red, cream, or green tea towels across the rungs. Add one short cedar swag and a pair of antique-style brass bells. Small ladders can cost $20 to $40 at Target or home stores, while Facebook Marketplace is worth checking for older wooden ones. Keep the ladder out of the main walking path and don’t use it as a step stool. Choose towels made from cotton or linen so they can actually be used for drying dishes. Wash them before storing them after Christmas, since kitchen fabrics collect grease and food odors quickly. This is a smart option for a narrow kitchen because the arrangement uses vertical space instead of counter or cabinet space. It also gives you a place to display your prettiest seasonal linens without hiding them in a drawer.
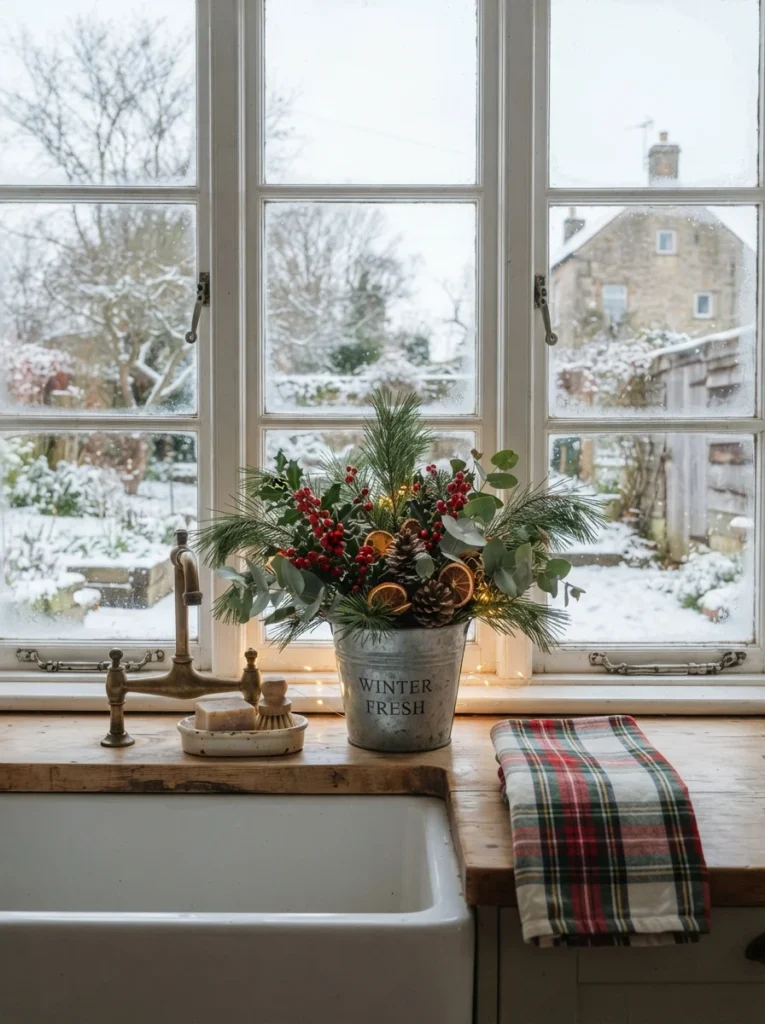
13. Use a Galvanized Bucket for Fresh Greenery
For a relaxed country-kitchen look, put a small galvanized bucket beside the sink and fill it with pine, cedar, eucalyptus, and a few red berry stems. A 1-gallon bucket is large enough for a noticeable arrangement without taking over the counter. Home Depot and Walmart carry small galvanized containers around $8 to $18. You can also find older ones at flea markets if you like a more weathered finish. Put a waterproof glass jar inside the bucket if you’re using fresh branches, since standing water can eventually leave marks on some surfaces. Trim the greenery every few days and replace cloudy water promptly. Keep the arrangement far enough from the faucet that it doesn’t get splashed constantly. The muted metal provides a nice contrast against cream cabinets and warm wood, while the greenery supplies most of the holiday color. It feels simple and useful, not like a decoration that was placed there just for the photo.

14. Give the Pantry a Little Holiday Detail
A pantry doesn’t have to stay completely separate from your Christmas decor. Add a few seasonal details to one shelf, such as red Mason jars, dried orange slices, pinecones, wooden scoops, and a short evergreen branch. Keep the food containers practical and group similar items together. Reserve one 24-inch shelf section for the holiday arrangement so the pantry remains easy to use. Mason jars from Walmart are inexpensive, and thrift stores often have older canning jars with more character. Wash jars thoroughly before storing food inside them and keep decorative greenery outside open food containers. A small wooden crate can create a second level for jars while adding more visual height. This approach works especially well in small kitchens because the pantry becomes part of the holiday styling without adding anything to your counters. You can also carry the same color palette into your [INTERNAL LINK: article about cozy vintage Christmas dining room decor] without making the kitchen look overly coordinated.

15. Make a Recipe Display Feel Festive
Turn your favorite family recipes into part of the holiday kitchen rather than hiding them in a drawer. Use a wooden magnetic board or simple framed corkboard and attach recipe cards with brass clips. Add a short red ribbon and one small evergreen sprig near the top corner. A 16-by-20-inch board fits nicely on a kitchen wall without overwhelming the room. IKEA has inexpensive wooden boards, while thrift stores often have frames that can be repurposed. Don’t hang fresh greenery directly over paper because moisture can stain the cards. Use faux greenery or a dried sprig instead. You can display recipes for cookies, pies, cocoa, or your family’s Christmas breakfast. The personal connection is what makes this idea work. It isn’t just another holiday sign. It gives the kitchen a little history and makes the room feel lived in. After Christmas, remove the greenery and keep the recipe display up year-round.

16. Tie Ribbon Around a Crock of Wooden Spoons
A crock full of wooden spoons is already useful kitchen storage, so it only takes one small change to make it festive. Tie a 1.5-inch-wide burgundy ribbon around the crock and tuck two short pine sprigs underneath the bow. Use a ceramic, stoneware, or vintage enamel crock in cream, brown, or muted green. Thrift-store crocks often cost $8 to $20, while new versions are available at Target and Walmart for around $15 to $30. Keep the ribbon away from the stovetop and remove it before washing the crock. If the greenery dries out, replace it rather than letting brittle needles accumulate near cooking surfaces. The display works because the kitchen remains practical. You’re not sacrificing drawer space or counter function just to decorate. The wooden utensils also add warmth against tile, stone, or stainless steel, making this one of the simplest vintage Christmas kitchen decor ideas for a busy cooking space.

17. Warm Up the Kitchen With Brass Lighting
Christmas decor doesn’t have to be the only source of holiday atmosphere. Swap a cool white bulb for a warm bulb in an existing pendant or table lamp. A 2700K LED bulb gives you a soft golden light that works beautifully with burgundy, green, cream, and brass. Home Depot and IKEA carry warm LED bulbs for roughly $5 to $12 depending on the pack. If your kitchen already has brass hardware, the warmer lighting makes those details stand out after sunset. Add a short cedar swag above the island or place a cranberry ceramic bowl underneath the pendant to connect the light with the holiday palette. Clean the fixture first with a dry microfiber cloth and follow the manufacturer’s cleaning instructions. Avoid placing greenery against a hot bulb or enclosed fixture. This is a particularly good trick for renters because changing a bulb costs very little and doesn’t require changing the actual light fixture.

18. Stack Old Cookbooks With Christmas Accents
Old cookbooks are wonderful Christmas decor because they naturally belong in the kitchen. Stack three or four books with red, green, brown, or cream covers on an open shelf, then place a small ceramic pitcher and evergreen branch on top. Three books make a comfortable stack height of about 8 to 10 inches. Thrift stores often sell vintage cookbooks for $2 to $6, so this can be one of the least expensive projects on the list. Check the books for water damage before bringing them into the kitchen, and keep them away from the sink and stovetop. Add a tiny wooden tree or brass bell beside the stack for another holiday cue. You don’t need to cover the books with ribbon or artificial snow. Their worn covers and pages already provide the character you’re after. This display is also easy to change after Christmas. Remove the greenery and keep the cookbooks exactly where they are for everyday kitchen styling.
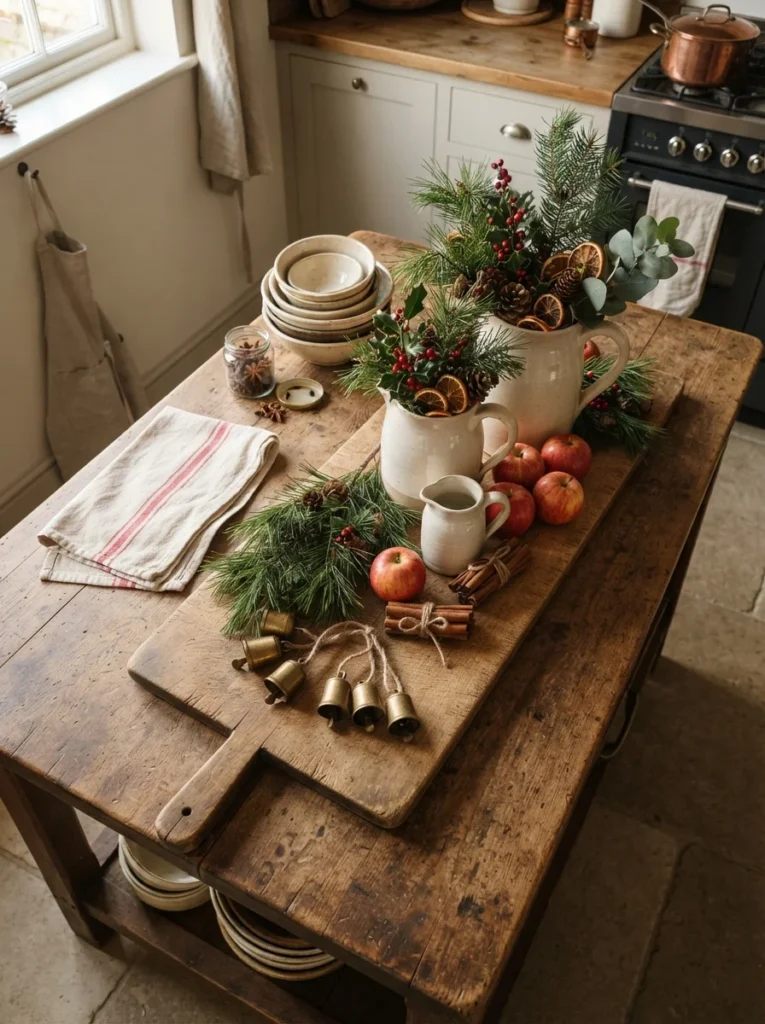
19. Style a Wooden Cutting Board as a Tray
Instead of buying another holiday tray, use a large wooden cutting board as a decorative base. Choose one around 18 to 22 inches long, then arrange a cream pitcher filled with greenery, a small bowl of red apples, and two brass bells on top. The board keeps the objects visually connected and makes it easy to clear the island when cooking. Look at IKEA, Target, or thrift stores for wooden boards between $12 and $30. If the board is used for food preparation, don’t mix decorative greenery with food on the same surface. Keep the holiday arrangement on a separate board reserved for display. Wipe unfinished wood with a barely damp cloth and dry it immediately. A few cinnamon sticks tucked beside the pitcher add another seasonal detail without adding clutter. This works particularly well in rustic or farmhouse kitchens, but the same setup can look polished in a more traditional room if you use a darker wood and antique brass pieces.

20. Add One Ceramic Christmas Tree
A ceramic Christmas tree gives you a classic vintage reference without requiring a full tree in the kitchen. Place a cream, white, or muted green ceramic tree on a shelf or small side table, then surround it with a few pinecones and one brass candleholder. A 10 to 14-inch tree is large enough to be seen but small enough for most kitchens. Walmart and Target often carry ceramic holiday trees for $15 to $30, while thrift stores are excellent for genuine vintage pieces. If the tree has small light openings, use the recommended bulb type and avoid overloading the electrical cord. Dust the surface with a soft cloth before storing it. Keep the surrounding area fairly simple because the shape itself provides plenty of holiday character. This is an especially useful choice for apartment kitchens where floor space is limited and a full Christmas tree would make cooking awkward.

21. Add a Little Candlelight to the Breakfast Nook
If you have a breakfast nook, give it a softer evening mood with two or three battery candles in small brass holders. Place them on the table beside a low pine centerpiece and keep the rest of the surface open. Three candles in mixed heights from 4 to 8 inches are enough for a small table. Target and Amazon carry flameless taper candles around $10 to $20 for a set. Choose warm white rather than bright white so the light works with your existing kitchen bulbs. Dust the holders with a soft cloth and remove batteries before storing the candles for the season. If you prefer real candles, use stable holders on a heat-safe surface and keep them away from curtains, greenery, and children. The glow makes dark wood and brass look richer after sunset, giving the breakfast nook a more intimate old-fashioned feeling. It also works nicely for Christmas morning coffee without adding another large decoration.

22. Use a Basket for Holiday Linens
A large woven basket can hold kitchen towels, table runners, cloth napkins, or extra throws while adding texture to an empty corner. Choose a basket around 14 to 18 inches wide and place it beside a pantry cabinet or breakfast nook. Fold red, cream, and green textiles inside so their edges are visible from above. Add one short pine branch or a brass bell to the handle. IKEA, Target, and HomeGoods commonly carry baskets for $20 to $40. Thrift stores can be even cheaper, especially for older wicker pieces. Keep fresh greenery in a separate water container rather than placing wet stems directly into the basket. Vacuum woven baskets with a brush attachment before storing them, since dust settles deep between the fibers. This idea gives you actual storage while still adding a holiday accent, which is especially useful in small kitchens where decorative pieces have to earn their space.

23. Decorate the Utensil Rail With Greenery
If your kitchen has a wall-mounted rail for utensils, use it as part of the Christmas styling. Keep the everyday copper or brass tools on the rail, then attach a 12-inch cedar or eucalyptus swag to one side with floral wire. Finish it with a narrow burgundy ribbon. This costs around $5 to $12 if you buy individual greenery stems from a craft store. Keep the greenery short enough that it won’t interfere with cooking or hang near a flame. Faux stems are particularly practical here because they don’t shed needles into the workspace. Wipe the rail and utensils before installing the decoration, then dust the greenery every few days. The mix of copper, brass, wood, and deep red creates a vintage palette without requiring new kitchen furniture. It also gives a plain backsplash some personality while leaving the cooking area fully functional.

24. Repeat Three Materials Throughout the Kitchen
A kitchen feels more pulled together if the same materials appear in several small places. Pick three, such as wood, brass, and evergreen, then repeat them across shelves, counters, cabinet tops, and the breakfast nook. For example, use a wooden tray on the island, brass candlesticks on a shelf, and cedar garland above the cabinets. Add cranberry textiles for color rather than introducing another material in every corner. You can also connect the kitchen to nearby rooms with [INTERNAL LINK: article about simple vintage Christmas living room decor] by repeating the same burgundy ribbon or brass accents. This doesn’t mean everything has to match. In fact, vintage rooms look better with small variations in texture and age. Before buying anything, walk through the kitchen and count what you already own. You may have plenty of wood, metal, ceramics, and textiles waiting to become part of the holiday setup.

Want the full Fall & Christmas Decorating Planner?
16 pages — color palettes, room-by-room checklists, DIY projects, shopping lists and more. Instant PDF download.
Get the Planner — $9Mistakes That Ruin the Look
- Decorating every inch of counter space: Leave clear areas around the sink, coffee maker, and main prep zone. A kitchen should still be easy to cook in.
- Using too much bright red: Burgundy, cranberry, and muted brick red have a softer vintage appearance. Pair them with cream and dark green.
- Putting greenery too close to heat: Keep pine, cedar, ribbons, and dried oranges away from stovetops, toaster ovens, radiators, and hot bulbs.
- Mixing too many styles: A farmhouse sign, glittery modern ornaments, coastal shells, and Victorian brass pieces can compete. Pick one main direction and repeat its colors and materials.

Frequently Asked Questions
Q: What is vintage Christmas kitchen decor?
A: Vintage Christmas kitchen decor uses traditional colors, old-fashioned kitchenware, natural greenery, wood, enamelware, brass, plaid, and warm lighting. The result feels nostalgic while keeping the kitchen practical.
Q: What colors work best for a vintage Christmas kitchen?
A: Cranberry red, burgundy, forest green, cream, warm white, brown, brass, and muted copper work especially well. You don’t have to use all of them at once.
Q: How can I decorate a small kitchen for Christmas?
A: Use vertical areas such as cabinet tops, open shelves, windows, wall rails, and narrow corners. A few small wreaths, a plaid towel, and one greenery arrangement can create plenty of holiday character.
Q: How much does vintage Christmas kitchen decor cost?
A: A small setup can cost around $30 to $75 if you shop thrift stores and use greenery from inexpensive craft-store stems. Larger displays with garlands, textiles, lighting, and vintage pieces can run $100 to $200.
Q: How do I keep Christmas greenery safe in the kitchen?
A: Keep fresh greenery away from flames, hot appliances, and high-heat light fixtures. Check it often and remove branches once they become dry or brittle.
[Image Prompt: A charming vintage Christmas kitchen at night with glowing windows, cream cabinets, cedar garland, cranberry pottery, brass lights, plaid textiles, and a softly decorated breakfast table, photographed from the doorway with warm ambient lighting. Shot on a high-end camera, natural light, no people, no text or words anywhere in the image.]
[Alt Text: Warm vintage Christmas kitchen decor creating a cozy holiday cooking space]
Make Your Kitchen Feel Like Christmas
You don’t have to buy a cart full of decorations to get a cozy holiday kitchen. Start with one area this weekend, such as the cabinet tops or coffee station, and add three things you already love: greenery, one traditional color, and an old-fashioned material such as wood, brass, enamel, or ceramic. That simple formula keeps vintage Christmas kitchen decor charming without making your cooking space difficult to use. If I were starting from scratch, I’d grab a thrifted crock, a few cedar branches, and a burgundy tea towel first. It’s inexpensive, takes about fifteen minutes to arrange, and gives you an immediate little Christmas corner.
Want the full Fall & Christmas Decorating Planner?
16 pages — color palettes, room-by-room checklists, DIY projects, shopping lists and more. Instant PDF download.
Get the Planner — $9